The yeast is busy eating up all the sugars in the wort. My blow off tube is working nicely. In retrospect, I may have panicked a little; I could have left the airlock overflowing for a bit and then cleaned it out after the krausen settled down (which it did).
Anyways, here's a video taken at 10/22/14 12:12 PM (about 48 hours later):
Notice the bubbles come out every 3-5s in the bottle.
Thursday, October 23, 2014

Tuesday, October 21, 2014
Explosion in the airlock!
At around 5pm 10/21/14, the airlock is literally bursting:


So I head over to More Beer and ask for advice. I get a blow off tube and attach it the airlock. The other end goes into a bottle of sanitized water. This lets the CO2 come out of the bucket, the prevents contamination:
Day 2: Active fermentation
Just checked on my beer and she's starting to ferment!

Here's a video showing it action (10/21/14 14:04, about 26 hours after pitching the yeast, temperature around 75F):
Brew Day
It's finally here! Brew Day!


Yeast and hops out and ready to go:

Ice in the box:

Me, ready to brew:

Just after boiling and adding in the DME:

After the initial boil off, added the wort and boiling for 60 minutes:

Preparing ice bath:

After 60 minutes, the wort in the ice bath:


Dumping 2 gallons of ice water and the wort and into the fermenter:

Hydrometer readings (looks to be around 1.056, around 60F):


Here is all my equipment, cleaned:
Here is the fermenter, all nicely sanitized by Star San (thats the bubbles on top):
Yeast and hops out and ready to go:
Me, ready to brew:
Just after boiling and adding in the DME:
After the initial boil off, added the wort and boiling for 60 minutes:
Preparing ice bath:
After 60 minutes, the wort in the ice bath:
Dumping 2 gallons of ice water and the wort and into the fermenter:
Hydrometer readings (looks to be around 1.056, around 60F):
Pitched yeast and capped (10/20/14 11:44 am):
A couple notes:
- Taking temperature measurements is awkward: I need to stick it close to the wort and risk contamination (from my hand, etc.)
- Cooling the wort with ice is awkward: I wish I had a wort chiller.
- I sanitized everything in the fermenter. I would have been easier to sanitize in another bucket (like my bottling bucket) so I wouldn't need to fish out the thermometer midway during cooling.
Sunday, October 19, 2014
Dry runs and finalizing the steps for Brew Day
For a first time brewer, the number of steps is a bit daunting (10+?). In addition, the steps vary from manual to manual, website to website, forum to forum. So, I decided to do a couple dry runs and make sure I have all the essential steps in a nice list. My brother-in-law, Zeon, helped a great deal. :)
Here's what I'm planning to use for Brew Day, below. Note the steps have already been modified to brew the German Hefeweizen (i.e. no steeping step for grains).
Here's what I'm planning to use for Brew Day, below. Note the steps have already been modified to brew the German Hefeweizen (i.e. no steeping step for grains).
Day-of Preparation Materials (in addition to the kit)
- 3 gallons of cold bottled water (used for topping off the wort in a partial boil)
- Ice (used for quickest cooling the wort)
Brew Day Steps
Sanitization Preparation
- Add 5 gal of water to fermenter
- Add 1 oz Star San to fermenter
- Add water to top off bucket
- Seal with lid and slosh around
- (wait during boil step below): Add Star San and water to bottling bucket
- Add thermometer
- Add stopper
- Add airlock
- Add spoon
Brewing
- Remove yeast from fridge and let it settle to room temperature (4 hours before use)
- Put 3 gal water into kettle and bring to boil
- Turn off heat and mix in malt extract
- Turn on heat and bring to boil
- Add hops
- Boil for 60 minutes, ensure it doesn't bubble over
- Sanitize equipment (see above)
- 15 min prior to the hour, prepare ice bath
- At 60 minutes, remove hops
- Put kettle in ice bath
- Cool to 130 F
- Drain fermenter
- Add 2 gal of cold water to fermenter
- Add wort to fermenter
- Top fermenter to 5 gal with cold water
- Take hydrometer sample
- Pitch yeast
- Place lid on fermenter
- Attach stopper and airlock (make sure it has water in it0
- Store in a dark place, temp between 65-70F.
Brewing Beer: buying the equipment
So, after much talking and drinking beer, I've decided to brew beer!
I got a bunch of equipment at More Beer in Los Altos.
Here's a snapshot of what I got:

It's a bit confusing but I basically replaced:
I got a bunch of equipment at More Beer in Los Altos.
Here's a snapshot of what I got:
It's a bit confusing but I basically replaced:
- Carboy -> fermenting bucket
- Blond Ale Kit -> German Hefeweizen Kit
- Removed the Bottles
- Got a giant ladle for mixing.
I also got a Pyrex measuring cup (for measuring Star San when sanitizing my equipment).
Next up: dry runs to make sure everything is ready!
Sunday, April 6, 2014
Building a Raspberry Pi-based Robot
Introduction
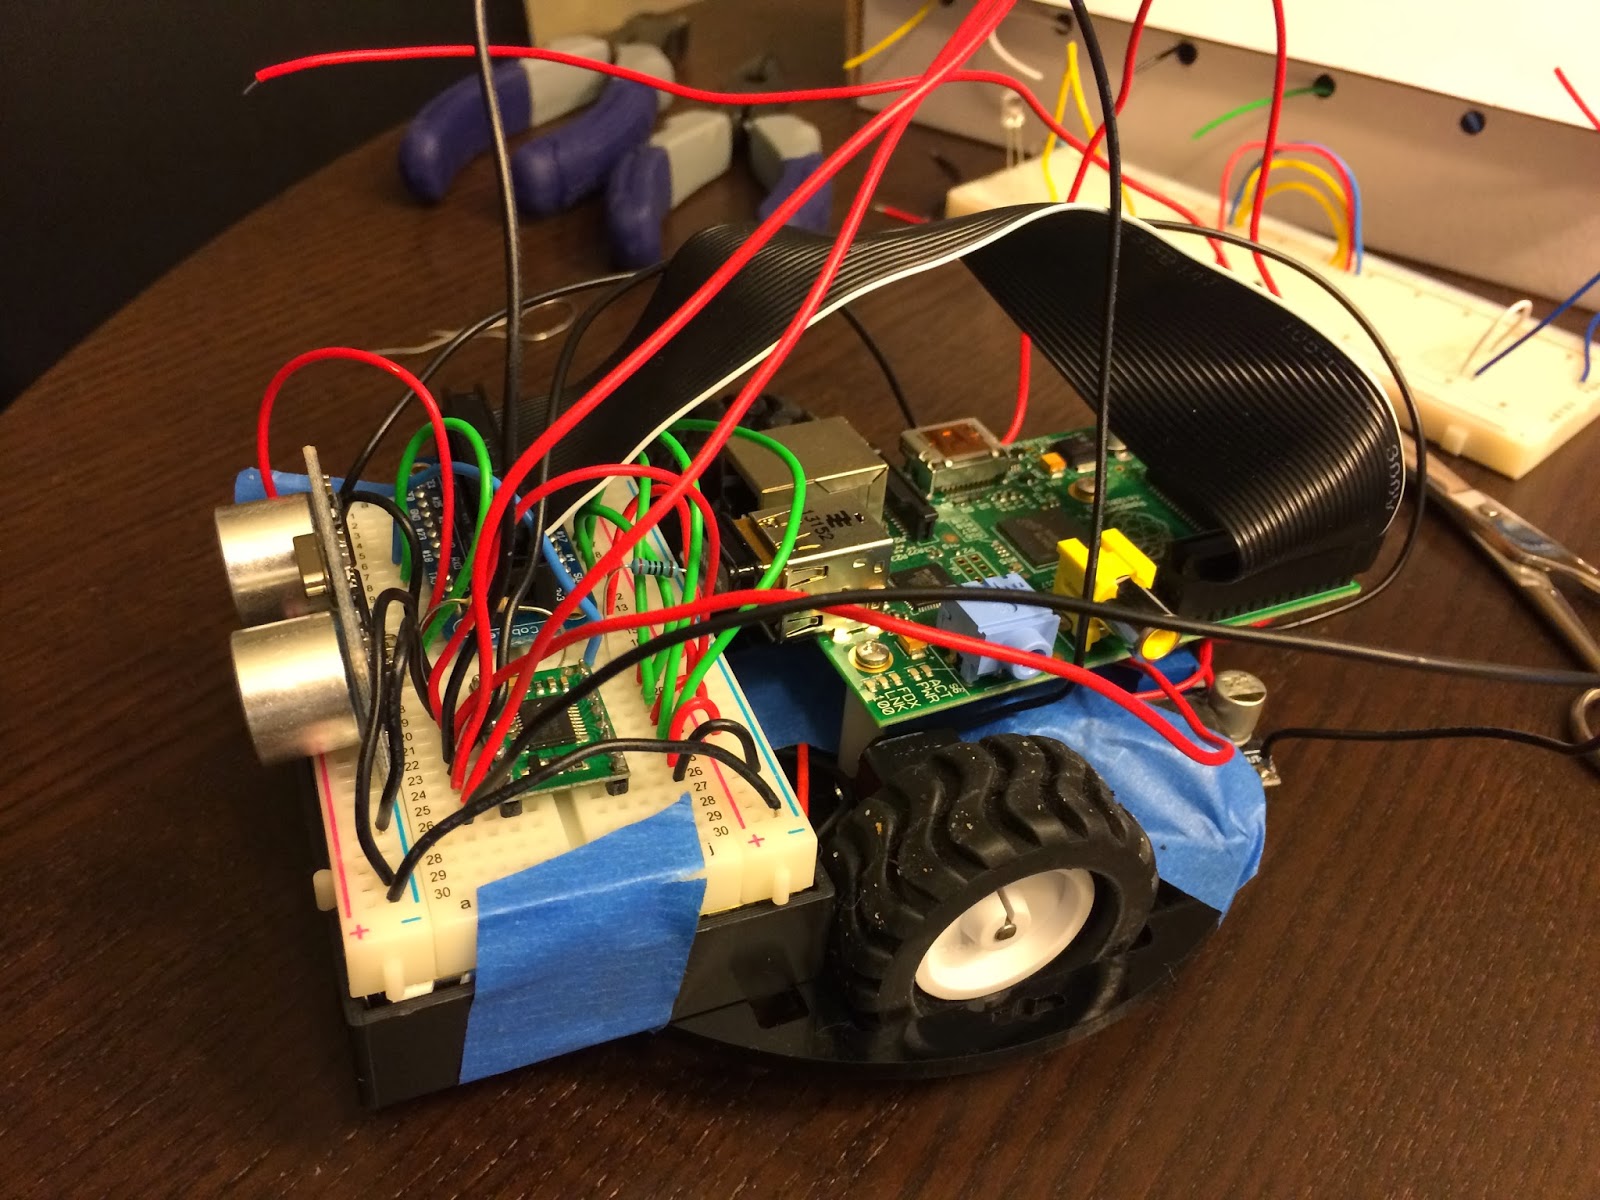
This is a summary of what I did to build the robot below. It's uses a Raspberry Pi for the micro controller and a variety of "cheap" pieces of electronics found all over the internet. There are quite a few robot kits out there, but I wanted to pick each piece myself so I could really understand the process. As a result, I've learned a lot and hope to share my gotchas.
Without further ado, I present Basil! A basic avoidance robot:

Hardware
Controllers
- 1 x RASPBERRY PI MODEL B 756-8308 Raspberry Pi B = 40.19
- 1 x #713 TB6612FNG Dual Motor Driver Carrier = 4.95
- 1 x RASPBERRY PI MODEL B 756-8308 Raspberry Pi B = 40.19
- 1 x #713 TB6612FNG Dual Motor Driver Carrier = 4.95
Sensor
Motors
- 2 x #992 100:1 Micro Metal Gearmotor = 31.90
- 1 x #1090 Pololu Wheel 42x19mm Pair = 6.98
Chassis
Power
Power
Miscellaneous
- 1 x 200 ohm resistor = basically free
- 1 x 400 ohm resistor = basically free
- 2 x Miniature Slide Switch = 2.58
- 1 x BB400 Solderless Plug-in BreadBoard = 4.40
- 1 x Adafruit Pi Cobbler Breakout Kit for Raspberry Pi = 13.99
- many wires
Wiring
I chose to wire everything on a 400 tie-point breadboard because I needed to mount the HC-SR04 sensor and didn't want to fork out mo' money for the mount. Also, the breadboard provides for easy prototyping without having to solder all the connections. Finally, the breadboard conveniently sits right on top of the 6-AA battery holder!
Here's the wiring diagram, using Fritzing:

What's not shown here is the wiring from the 6xAA battery pack to two LM2596 Voltage step down modules which step down the voltage from 7.2V to 5.0V and 6.0V for the Raspberry Pi and motors, respectively.
The other interesting piece is the resistors in series connecting the HC-SR04's echo pin to ground. Since the HC-SR04 is powered by 5V, its waveform back to the Raspberry Pi will have an amplitude of 5V. This is too high input voltage for the Pi's GPIO pin. So GPIO23 is connected between a 400Ω and 200Ω resistor. In the diagram above, the order is Signal -> 200Ω resistor -> (GPIO23 is connected here) -> 400Ω resistor -> GND. The 200Ω resistor drops the 5V source by 1.33V, so it's voltage is exactly 3.33V when measured by the GPIO23 pin. This is commonly called a voltage divider.
Code
The code is divided into 3 major parts:
- RobotBrain.py: which contains the high-level logic for moving around
- HCSR04.py: the sensor, which should really be called "Sensor.py" to abstract from the actual hardware I used
- MotorDriver.py: the driver for the motor controller (i.e. TB6612FNG)
Video
Subscribe to:
Posts (Atom)